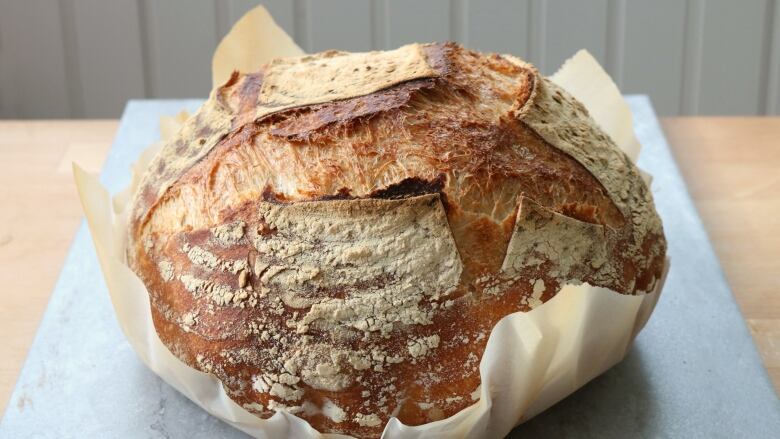
The baking project that's not as high-maintenance as you think: Sourdough
Sourdough starters have been known to last for generations
The midwinter months seem to be sourdough season the time of year when people resolve to be thriftierand make things from scratch.
The shorter days and cold weather also inspires more indoor projects, particularly those that involve a warm oven.
Sourdough is a great project. All you need is flour, salt and water.
Before commercial yeast was introduced in the late 19th century, bakers would harvest wild yeast, or use the foam from the top of fermenting beer, to help their bread rise.
Sourdough starters have been known to last for generations, and are said to improve and become more complex with age. Some encourage a wider community of wild yeasts by taking theirs out for a walk, exposing them to a wider range of environments.
I'm often asked where to buy sourdough starter, or a sourdough starter "kit,"but all you need to start your own is flour and water.
Some begin with rye or whole wheat flour. The theory is that there are more natural yeasts on the surface of these grains to get you started. Others suggest adding grape or apple skins (also for potential yeast action). But neither additions nor fancy flours are necessary.
Mix equal parts flour and water by weight I do 1 cup flour and cup water into a thick paste. Some use their fingers (your skin has yeast on it, too), or you could use a fork or spoon.
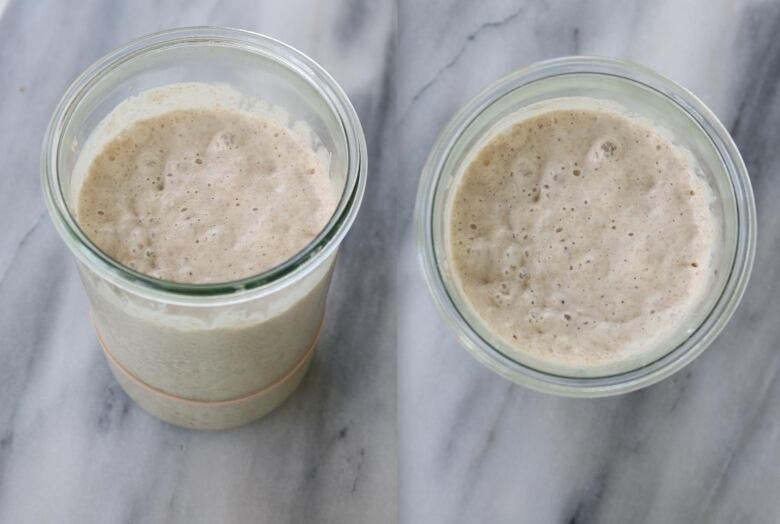
Mix it up in a glass jar or non-reactive vessel that has enough room for it to grow. I like glass because you can see the bubbles on the side as well as the top; wide-mouthed Weck jars are my favourite, and allow for easy stirring.
Loosely cover and leave on the counterat room temperature.
Waiting game
After 24 hours, you'll see some activity. It will start to bubble and ferment.
Discard half and feed it the same way you started it, equal parts flour and water, by weight.
I leave the jar open for a bit to give it access to the air, but you don't want it to dry out, which is easy to do in Calgary's climate.
Keep doing this every day. Split and discard half, and feed it.
Some people make it easier by marking off the level they want to discard to with an elastic band around the jar. Ultimately, you should be feeding the starter the same quantity in flour and water, by weight (i.e.,discard all but 4 oz of the starter, feed with 4 oz flour and 4 oz water).
Ideally, you'd bake with the discard, rather than tossing it.
If it's not bubbling and robust, with enough energy to leaven a loaf of bread, it can still be used in baked goods for its sour flavour (you can always add a bit of commercial yeast to help it along), or in things that don't rely on a natural rise, like pancakes and waffles.
I often add some starter to a batch of no-knead bread for flavour. It has a similar hydration level (100 per cent), so you don't even need to adjust the recipe.
After a few days, your starter should be bubbly and tripled in size, with a clean, vinegary smell. Name it! It's alive!!Take it out for a walk, if you like.
It should take about a week to build it up and make it more robust and strong, depending on the environment and temperature. It grows more quickly when it's warm, slows down when it's cold.
If you want to back it up, put some in the freezer (though this may kill some of the bacteria) or dry by spreading thinly onto parchment and leaving it out until completely dry. Even a low oven will kill the yeast.
To reconstitute, crumble or grind and soften in water, then feed to bring it back to life. Kept out at room temperature, a starter will require regular (daily, every second day or even twice daily) feeding, depending on your baking schedule.
To slow it down, keep in the fridge and feed once a week, or bring a dormant starter back to life by feeding at room temp for a day or two before you're ready to bake.
If you only bake the occasional loaf, a weekly feeding is sufficient; a daily schedule is only necessary to keep it robust and active so you're ready to bake bread every day or so.
It's tougher to kill than you might think, and will stay dormant in the back of the fridge for ages. If it develops a layer of liquid (hooch) on the surface, stir it back into the starter if you like it tangy, or pour it off. (It'll get darker the older it gets that's OK.)
Feed it and bring it back to life! If it grows fur or orange/pink mould, toss it. But I've never had this happen.
Once the starter is bubbly and robust, you're ready to bake!
If you have discardyou don't want to waste, try stirring it into pancake or waffle batter, or use it in place of some of the buttermilk or cream in a batch of biscuits.
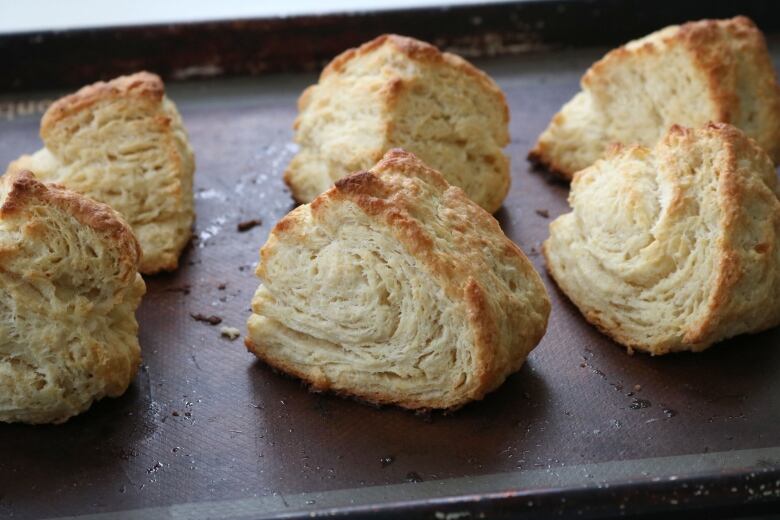
Sourdough Buttermilk Biscuits
- 2 cups all-purpose flour
- 2 tsp baking powder
- tsp baking soda
- tsp salt
- cup butter, chilled
- cup sourdough starter discard
- cup buttermilk
Preheat the oven to 425 F.
In a large bowl, stir together the flour, baking powder, baking soda and salt.
Slice or cut the butter into the flour mixture, or grate it on the coarse side of a grater.
Toss to combine, or rub bigger pieces into the flour with your fingers. Don't rub it all the way in, you want some bigger pieces left.
In a measuring cup, stir together your sourdough starter and buttermilk, add to the dry ingredients and stir just until the dough comes together. It will be a bit shaggy.
Gather it all up, including all the rough bits in the bottom of the bowl, and either pat it out an inch thick on a parchment-lined baking sheet or, if you like, pat it out about half an inch thick and fold it over itself in thirds, as if you were folding a letter. This will give you satisfying layers, but it's truly not necessary.
Pat the dough about an inch thick and cut into wedges, squares or rounds with a sharp knife or cookie cutter.
If you're using a cutter or glass rim, try not to twist itas this could seal the cut sides a bit, keeping them from maximum lift.
Brush the tops with a bit more buttermilk or cream (there should be enough in the bottom of the measuring cup) and bake for 15-20 minutes, or until risen and deep golden.
Makes about eight biscuits.


_(720p).jpg)


 OFFICIAL HD MUSIC VIDEO.jpg)
.jpg)


